


Published on
July 30, 2025
Typography plays a huge part in web design. The right brand fonts can enhance your website’s typography, making it more readable and aligned with your brand’s personality. Whether you’re using Showit’s default font options or uploading custom fonts, properly setting up typography ensures a cohesive, professional look.
In this guide, you’ll learn:
- How to add custom fonts to your Showit website
- How to fine-tune font styles, weights, and sizes
- How to use custom CSS for advanced font customization
- How to improve readability with letter spacing and line height.
Let’s dive into the process of customizing Showit fonts and making them match your brand perfectly!
Understanding Fonts in Showit
Custom fonts are a cornerstone of your brand’s identity, setting the tone and adding personality to your website. Showit allows you to upload and customize your own fonts, ensuring your site stands out and aligns perfectly with your brand. To use custom fonts, you need to upload them in the correct format, specifically the .WOFF format. If your font isn’t in .WOFF format, you might need to purchase a specific license or use a webfont generator like Font Squirrel to convert it. Understanding the basics of font files and formats is essential for working with custom fonts in Showit, ensuring they display correctly and enhance your site’s design.
Choosing the Right Fonts for Your Showit Website
Before you start customizing fonts, it’s important to choose fonts that reflect your brand’s typography. The right font selection helps with readability, visual appeal, and setting the right tone for your Showit site.
1. Default Fonts vs. Custom Fonts in Showit
Showit offers a default set of fonts, including Google Fonts and Adobe Fonts, but you can also upload your own custom fonts to better align with your brand.
2. Where to Find the Perfect Font Combination
- Google Fonts: A free and extensive font library available directly in Showit’s Design Settings.
- Adobe Fonts: If you have an Adobe subscription, you can sync fonts directly to Showit.
- Custom Fonts: You can upload your own WOFF font file or other supported formats to personalize your design.
Adding Custom Fonts to Showit
Uploading Font Files to Showit
⚠️ WOFF2 files are not supported in Showit. Some converted fonts may not work well for web use.
If you want to use a custom font, you’ll need to upload a WOFF font file to Showit’s media library. To edit Showit custom fonts, ensure you are using the correct .WOFF format, as it is crucial for maintaining your brand’s typography and identity.
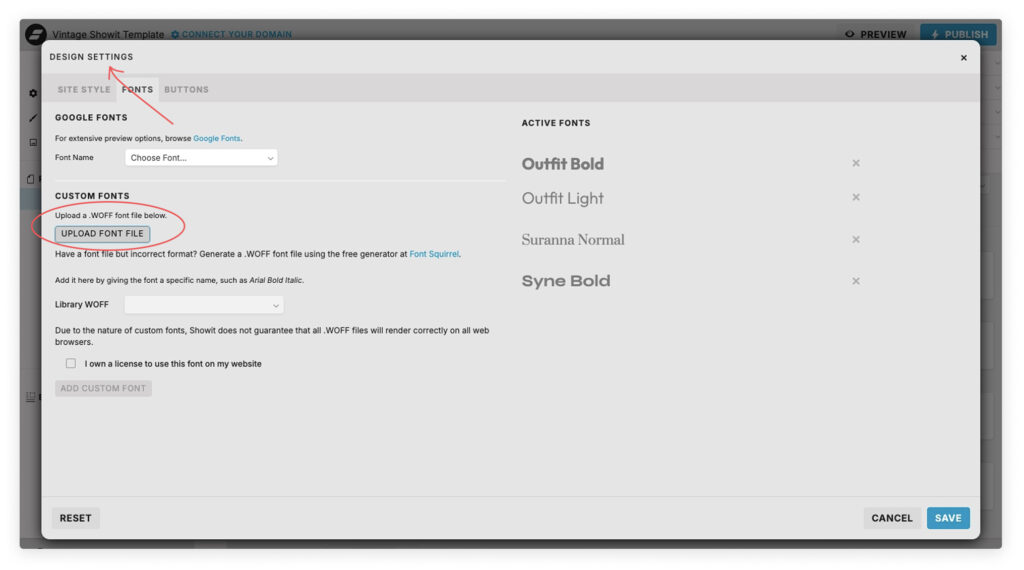
Steps to Add Custom Fonts:
- Go to Showit Design Settings.
- Click on the Fonts tab in the dropdown menu.
- Scroll down and click Upload Font.
- Choose a WOFF format font file from your computer.
- Click Save and your font will be available in Showit.
Working with Font Files
A font file is a digital file that contains the design and layout of a font. There are several types of font files, including .WOFF, .OTF, and .TTF. For web use, .WOFF (Web Open Font Format) is the recommended format due to its optimized performance. If your font file isn’t in .WOFF format, you can use a font converter tool like Font Squirell to change it. Uploading the correct font file format is crucial for ensuring that custom fonts display correctly in Showit, providing a seamless and professional look to your website.
Applying Custom Fonts to Your Showit Website
Once your custom font is uploaded, you can apply it to your Showit site by adjusting your Site Styles.
Setting a Default Font Family
- Open Showit Design Settings.
- Under Site Styles, choose a font for Headings, Body Text, and Paragraph Text.
- Adjust the font weight, size, and letter spacing as needed.
Customizing Font Settings for Specific Elements
- Headings: Use bold or large fonts to make headings stand out.
- Body Text: Choose a legible font with proper line height.
- Buttons & Call-to-Action (CTA): Use a strong, eye-catching font style.
Fine-Tuning Typography Settings
To make your website’s typography more polished, adjust these key settings:
1. Font Size & Weight
- Font Size: Controls how large or small the text appears.
- Font Weight: Adjusts the boldness (Light, Regular, Bold, Extra Bold).
- Font Style: Italic, underlined, or uppercase for different design needs.
2. Letter Spacing & Line Height
- Letter Spacing: Increases or decreases space between letters to improve readability.
- Line Height: Adjusts vertical spacing between lines of text.
Paragraph Spacing: Keeps text from looking too cluttered.
Using Custom CSS for Advanced Font Customization
For designers who want more control, custom CSS can help refine typography.
Adding Custom Fonts via CSS
- Navigate to Custom Head HTML Section in Showit.
- Insert your custom CSS code, such as:
@font-face {
  font-family: 'MyCustomFont';
  src: url('https://yourwebsite.com/fonts/mycustomfont.woff') format('woff');
}
3. Apply the font in your custom CSS styles:
h1, h2, h3 {
  font-family: 'MyCustomFont', sans-serif;
}
Troubleshooting Common Issues
Encountering issues with custom fonts in Showit can be frustrating, but most problems have simple solutions. Common issues include font files not uploading correctly or fonts not displaying as expected. To troubleshoot, first check that your font file is in the .WOFF format. Next, review the font settings in the Showit design settings panel to ensure everything is set up correctly. If problems persist, try using a different font file or reach out to Showit’s customer support team for assistance.
Saving & Publishing Your Changes
Once you’ve set up your fonts, don’t forget to hit save!
Steps to Finalize Your Typography Settings:
- Click Save & Preview to check how fonts appear on desktop and mobile.
- Make adjustments if necessary (such as tweaking letter spacing or font weight).
- Publish your Showit site to make your typography changes live.
More Resources & Next Steps
Now that you’ve customized your Showit fonts, you might be interested in additional Showit design tip
📌 Related Resources:
- How to Style Showit Buttons & Call-to-Actions
- Creating Custom Navigation Menus in Showit
- The Ultimate Guide to Showit Custom Code
Need extra help with typography on your Showit website? Contact us through this form.
You’ve GOT what it takes
Download 30 marketing ideas on how to promote your website

