


Published on
April 22, 2025
Showit is a great tool and a powerful website design platform known for its drag-and-drop interface and creative flexibility. One of its standout features is Canvas Views, which allow designers to create dynamic, interactive content sections without coding. By leveraging Canvas Views effectively, you can make your website more engaging and visually appealing while ensuring a seamless user experience.
In this article, you’ll learn how to add and organize Canvas Views, set up transitions, implement click actions, create interactive sections, and optimize your designs for mobile.
Key Takeaways
- Canvas Views in Showit enhance user engagement by allowing unique content interactions while maintaining design consistency.
- Proper organization, naming, and design of Canvas Views improve the user experience, while transitions and click actions increase interactivity. For example, using clear and descriptive names for each canvas helps easily identify and manage different sections of your website.
- Optimizing Canvas Views for mobile devices and avoiding common mistakes ensures smooth navigation and maintains user interest across various platforms.
Understanding Canvas Views in Showit
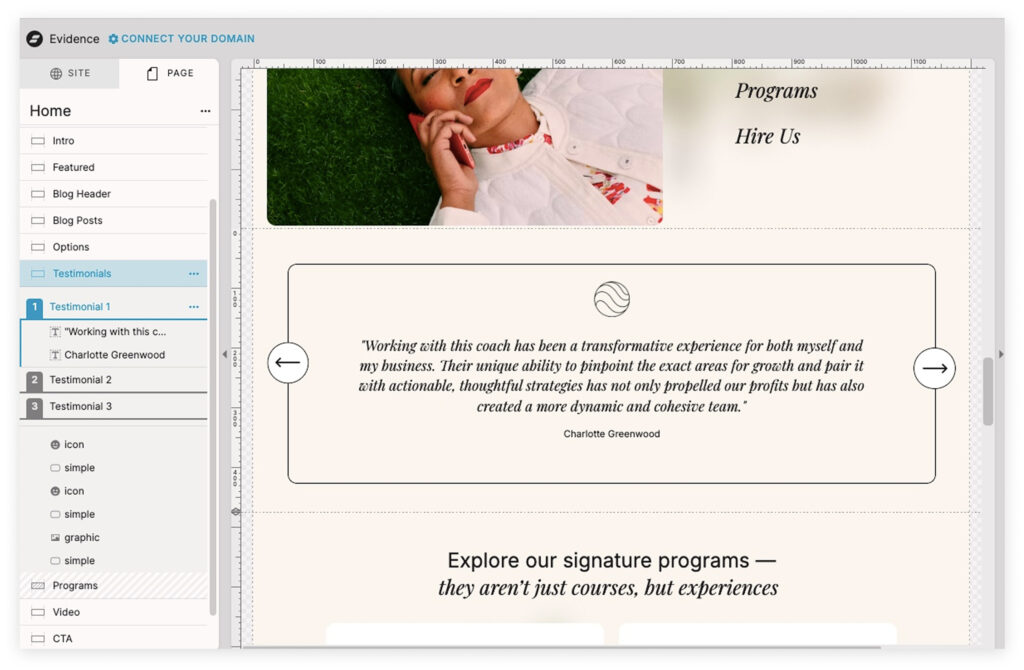
Canvas Views in Showit work similarly to slideshow slides, where each view can hold unique content. A Canvas View is basically a folder with elements that appears within a canvas. When you have several Views within one Canvas, you have several click-through slides within one website section. This feature allows you to stack different slides with information within the same canvas, boosting interactivity and engagement without needing separate pages. Additionally, Canvas Views enable you to layer information within various sections of a website, creating a dynamic content display.
Why Use Canvas Views?
- More engaging designs – Users can navigate content without excessive scrolling.
- Better site performance – Reduces page clutter by consolidating elements into a single section.
- Creative flexibility – Enables tabbed content, slideshows, pop-ups, and more.
- Seamless transitions – Users can scroll or click through sections effortlessly.
Each Canvas View retains its parent canvas’s dimensions, ensuring design consistency across views. Mastering Canvas Views will allow you to create fluid, dynamic experiences that keep visitors engaged.
Adding Your First Canvas View
Adding a Canvas View in Showit is simple:
- Select the target Canvas in the right panel.
- Click the three dots next to its name and choose “Add Canvas View.”
- A new view will be added. Drag it into position for better organization.
Once your Canvas View is added, assigning an appropriate canvas name is essential for easy management and functionality.
Naming and Organizing Your Canvas Views
Why Naming Matters
If you’re using multiple Canvas Views, proper naming helps keep your workspace organized and makes future edits faster.
Best Practices for Naming
- Use clear and descriptive names like “FAQ Section” or “Portfolio Gallery.”
- Avoid generic names like “Canvas 1” or “View 2.”
- If working on a multi-step form, name views Step 1, Step 2, Step 3, etc.
Organizing Canvas Views
- Drag your views in a logical order so they appear in the sequence you want.
- If using static elements like navigation buttons, keep them outside the Canvas Views so they remain visible at all times. Organizing views in a sequence can create loop canvas views, enhancing user engagement by allowing users to navigate through multiple views seamlessly.
Designing Your Canvas Views
Once your Canvas Views are added and named, it’s time to design them.
Adding Elements to a Canvas View
- Drag and drop text boxes, images, icons, and buttons into your Canvas.
- Arrange them strategically to balance visual appeal and usability.
- Use layering techniques like overlaying text on images or using clickable icons to trigger hidden content.
Creating Multiple Canvas Views
Multiple Canvas Views allow you to display different content within the same canvas. This is perfect for:
- Product galleries
- Testimonials sliders
- Step-by-step guides
- Tabbed content
How to Add Multiple Canvas Views
- Select an existing Canvas.
- Click the three dots and choose “Add Canvas View.”
- Duplicate views if you want to keep the layout but change the content.
Using multiple Canvas Views keeps your website cleaner and more interactive.
Setting Up Transitions for a Smooth Experience
Why Use Transitions?
Transitions create a seamless flow between Canvas Views, making navigation more engaging.
Types of Transitions in Showit
- Fade – Smoothly transitions between views.
- Slide In/Out – Moves views from left, right, top, or bottom.
- Instant Switch – No animation; the view changes immediately.
How to Set Up a Transition
- Select a Canvas View.
- Open the View Transitions tab in the Properties Panel.
- Choose the desired transition effect and timing.
Using Click Actions for Interactive Content
Click Actions allow users to navigate through Canvas Views, reveal hidden content, or trigger animations.
How to Add a Click Action
- Select a button, icon, or image.
- Open the Click Actions tab in the right panel.
- Choose “Go to Canvas View” and select the corresponding view.
Examples of Click Actions
- Click tabs to reveal different services.
- Click a “Next” button to switch between testimonials.
- Click an image thumbnail to load a full-sized view.
Advanced Features: Hidden Canvases and Auto Advance Views
Hidden Canvases for Pop-Ups and Slide-Out Menus
Hidden Canvases remain invisible until triggered by an action like a button click.
Use Cases
- Pop-up testimonials
- Hidden pricing details
- Slide-out navigation menus
How to Create a Hidden Canvas
- Select a Canvas and set it to “Hidden to Start.”
- Add a Click Action to reveal it when triggered.
- Include a Close Button (X icon) to let users exit the hidden Canvas.
Auto Advance Views for Slideshows
Auto Advance View allows Canvas Views to cycle automatically—perfect for testimonials, galleries, and hero sections.
How to Enable Auto Advance View
- Select a Canvas View.
- Open the View Transitions tab.
- Enable Auto Advance and set the duration.
Optimizing Canvas Views for Mobile
Showit allows mobile-specific adjustments, so be sure to optimize Canvas Views for different screen sizes.
Mobile Optimization Tips
- Resize text and images for small screens.
- Hide unnecessary elements to declutter the mobile layout.
- Keep clickable elements large for easy interaction.
Common Mistakes to Avoid
- Poor organization – Confusing Canvas View names make future edits harder.
- No transitions – Sudden jumps between views feel jarring.
- Unoptimized mobile layout – A cluttered mobile view can drive users away.
- Broken click actions – Ensure all buttons and links function correctly.
Avoiding these issues will help keep your website polished and user-friendly.
Make your website more dynamic
Mastering Showit’s Canvas Views can transform your website into a dynamic and interactive experience. Whether you’re building:
- Portfolio showcases
- Testimonial sliders
- Step-by-step guides
- Interactive FAQs
- Slide-out menus
Canvas Views help keep content structured, engaging, and easy to navigate. By organizing your views, setting up transitions, and optimizing for mobile, you can create a seamless and captivating user experience.
Start experimenting with Canvas Views to unlock your website’s full potential. Need help with your Showit site? Contact us through this form.
Frequently Asked Questions
How do I add a new canvas view in Showit?
To add a new canvas view in Showit, select the target canvas, click the three dots next to its name, and choose ‘Add Canvas View’ from the right-hand panel.
What are hidden canvases, and how do I use them?
Hidden canvases are elements that stay invisible until an action, like a button click, reveals them. Use them to enhance user interaction by displaying dynamic content, such as pop-up menus.
How can I optimize my canvas views for mobile devices?
To optimize your canvas views for mobile devices, resize design elements, configure settings specifically for mobile, group elements for proper arrangement, and prevent any overlap. This ensures a seamless user experience on smaller screens.
What are some common mistakes to avoid when using canvas views?
To ensure an effective use of canvas views, avoid poor organization, neglected transitions, and improper click actions. Make sure to optimize for mobile devices. Focusing on these aspects will greatly enhance user experience and functionality.
How can I enhance the functionality of my Showit site using canvas views?
Enhancing the functionality of your Showit site with canvas views involves using custom code, layering elements for intricate designs, and implementing templates alongside custom animations and transitions to create an engaging user experience.
You’ve GOT what it takes
Download 30 marketing ideas on how to promote your website

